Volkswagen Golf Service & Repair Manual: Adjusting installation position of tail light
 Note Note
| Installation position can only be corrected on tail light
cluster on body. |
| Removal and installation are described for the left side.
Removal and installation on the right side are carried out in
the same way. |
| – |
Turn light switch to “0” position. |
| – |
Open cover in luggage compartment side trim. |
|
|
|
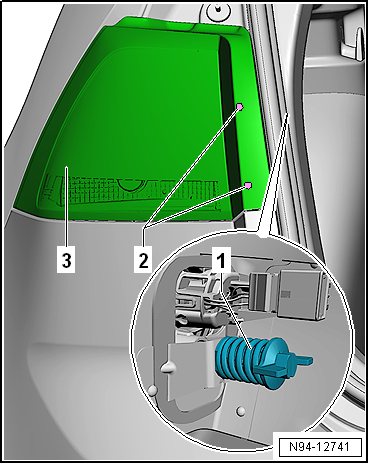
| – |
Loosen securing element -1- by
two turns. |
| – |
Insert screwdriver T10 bit into trim openings
-2-. |
Note
| Ensure that the tail light -3-
lies flush against the surrounding components. |
| – |
Adjust installation position of tail light by screwing
adjuster elements in or out. |
| – |
Tighten securing element -1-. |
| – |
Close cover in luggage compartment side trim. |
| → Chapter „Assembly overview - tail lights in rear lid, with
bulbs“ |
|
|
|
Note
Removal and installation are described for the left side.
Removal and installation on the right side are carried out in
the same way.
...
Note
Removal and installation are described for the left side.
Removal and installation on the right side are carried out in
the same way.
...
Other materials:
Removing and installing suction-jet pump
On vehicles with four-wheel drive the fuel tank is divided
into a left and a right chamber. A suction-jet pump
-2- is used for delivering fuel
from the left fuel tank chamber to the baffle housing of the
fuel delivery unit -1- on the
right.
...
Repairs to CAN bus wiring
An unshielded two-wire line -1-
and -2- with a cross section of
0.35 mm2 or 0.5 mm2
is used for CAN bus wiring.
The colour codes of the CAN bus wiring can be gleaned from
the following table:
...
Assembly overview - skid plate
Note
The removal and installation procedures may have to be modified
slightly depending on engine fitted.
1 -
Underride guard
Removing
–
Remove bolts -2-,
-3- and -4-.
–
Pull out noise ...
© 2016-2024 Copyright www.vwgolf.org

 Removing and installing tail light in rear lid
 Removing and installing tail light