Volkswagen Golf Service & Repair Manual: Assembly overview - drive shaft, constant velocity joint VL107
| Loosening and tightening
→ Chapter |
| Before fitting, clean the threads in the CV joint using a thread
tap. |
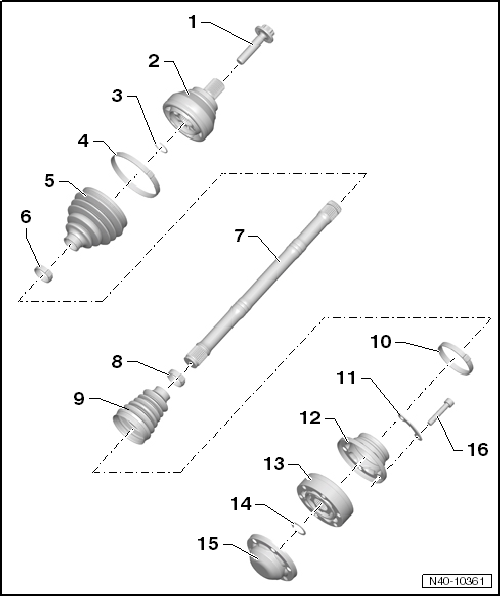
| 2 - |
Outer constant velocity joint |
| Renew only as complete unit |
| Installing: drive onto shaft to stop using plastic hammer |
| Insert in groove in shaft |
| Check for splits and chafing |
| Material: Hytrel (polyester elastomer) |
| 9 - |
Boot for constant velocity joint |
| Material: Hytrel (polyester elastomer) |
| Check for splits and chafing |
| Drive off constant velocity joint with a drift |
| Coat sealing surface of constant velocity joint with -D 454 300 A2-
before installing. |
| Drive off carefully with drift |
| Coat sealing surface of constant velocity joint with -D 454 300 A2-
before installing. |
| Adhesive surface must be free of oil and grease! |
| 13 - |
Inner constant velocity joint |
| Renew only as complete unit |
| Remove and install with circlip pliers -VW 161 A-. |
| 16 - |
Multi-point socket head bolt |
| Initially tighten diagonally to 10 Nm and then tighten diagonally to
specified torque. |
1 -
Outer constant velocity joint
Renew only as complete unit
Removing
→ Anchor.
Installing: drive onto sha ...
1 -
Bolt
Renew after removing
Loosening and tightening
→ Chapter
Before fitting, clean the threads in the C ...
Other materials:
Removing and installing rear shelf support
Note
Removal and installation are described for the left vehicle
side. Follow same instructions for the right side as
appropriate.
Special tools and workshop equipment
required
...
Removing and installing evaporator
Note
The illustration shows a left-hand drive vehicle. The
removal and installation procedure is identical for both
versions.
Removing
–
Observe instructions when working on refrigerant circu ...
Rear brakes
Rear brakes FNc-M38 (15”):
Item
PR No.
1KE / 1KV
1
Brake caliper
FNc-M38 (15”)
2
Brake pad,
thickness
mm
11
Brake pad, wear limi ...
© 2016-2025 Copyright www.vwgolf.org


 Assembly overview - drive shaft, constant velocity joint VL100
 Assembly overview - drive shaft, triple roller joint AAR3300i