Volkswagen Golf Service & Repair Manual: Installing brackets for parking aid system
| Special tools and workshop equipment
required |
|
|
|
| |
|

Installation tool for PDC bracket -VAS 6614- |
|
|
|
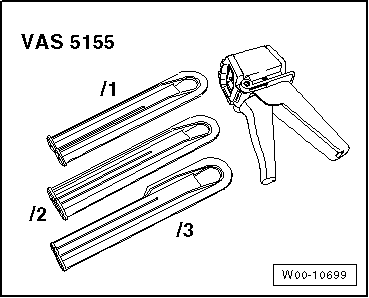
Cartridge gun -VAS 5155- |
| |
2-component plastic adhesive |
|
→ Electronic Parts Catalogue “ETKA” |
| |
Bonding agent for plastics |
|
→ Electronic Parts Catalogue “ETKA” |
|
|
→ Electronic Parts Catalogue “ETKA” |
|
|
→ Electronic Parts Catalogue “ETKA” |
 Note Note
-
| |
Observe manufacturer's instructions enclosed in the
packaging. |
-
| |
Observe minimum curing period. |
|
|
|
Note
| The brackets are installed after the bumper cover has been painted. |

| The 4 markings for brackets -1- can be
found on the inside of the bumper cover. |
| – |
If there are no markings, the centre point -2-
must be determined. |
| – |
The holes must be drilled from the inside to the outside with the
drill in the tool kit -3-. |

| – |
Set hole punch in position with bolt head -1-,
washer -2- and thrust bearing
-3- from inside bumper cover
-5-. |
| – |
Screw on punch -4-, not quite as far as
bumper cover. |
| – |
Press punch -4- against bumper cover. |
| – |
Tighten hole punch -1-. |
Note
| The punch -4- must not turn on the
paint of the bumper cover. |
| – |
Pull the punch -4- through the material
of the bumper cover -5--arrows- by turning
the bolt head -1-. |
| – |
Remove hole punch and make the next holes. |
| – |
Thoroughly clean bumper cover and bracket with cleaning solution. |
Note
| Approx. 1 cm of adhesive from tip should not be applied. |
| – |
Lightly sand inside of bumper cover -6-
and clean thoroughly. |
| – |
Apply a very thin layer of bonding agent for plastics to bumper
cover and bracket and allow to flash off for 10 minutes. |
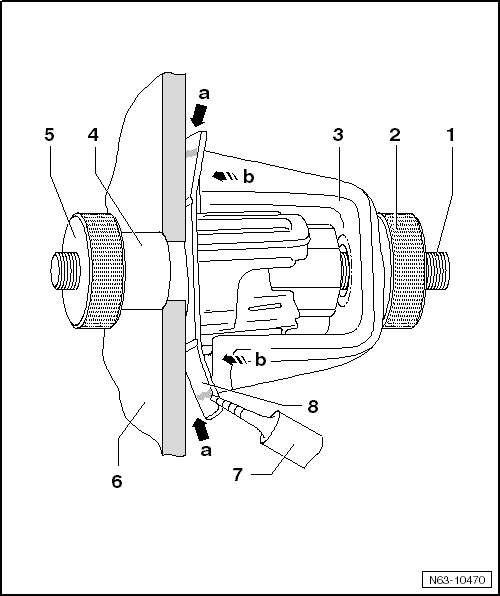
| – |
Push bracket -8- onto centring pin
-1- and through bumper cover
-6-. |
| – |
Push counterhold -4- on and gently
tighten knurled nut -5-. |
| – |
Push clip -3- on and then place knurled
nut -2- in position but do not tighten it. |
| – |
All the brackets are prepared to this stage. |
Note
| The adhesive must not run into the angle. |
| – |
Apply adhesive as shown in illustration and tighten knurled nut
-2-. |
| – |
Remove all centring pins after minimum curing period. |
| Do not carry out any further work on bumper cover or
brackets until the minimum curing period of 30 minutes has
expired. |
| In this time, the bumper cover must remain where it is and
should not be moved. |
|
|
|
Volkswagen R GmbH, optional equipment, “R Line” and “R”
Special tools and workshop equipment
required
...
Other materials:
Pneumatic brush grinder set -VAS 6446
Designation:
Pneumatic brush grinder set -VAS 6446-
Product description:
The pneumatic brush grinder set -VAS 6446- serves as a
surface treatment tool.
Suitable for removal o ...
Fuse tables for fuses in the engine compartment
Fig. 231 Engine compartment: fuse layout
First read and observe the introductory information
and safety warningsThe table shows the fuse locations for the items of electrical
equipment which are most relevant to the customer. The left column contains the
location, the other columns contain ...
Removing and installing actuator
Removing
–
Removing tank flap unit
→ Chapter
–
To get access to connector, remove right luggage compartment side
trim
→ General body repairs, interior; Rep. gr.70
–
Separate ...
© 2016-2024 Copyright www.vwgolf.org

 Removing and installing bumper cover
 Rear bumper