Volkswagen Golf Service & Repair Manual: Removing and installing A-pillar gap cover
 Note Note
| Removal and installation are described for the left
vehicle side. Follow same instructions for the right side as
appropriate. |
| Special tools and workshop equipment
required |
|
|
|
| |
|

Removal wedge -3409 |
| – |
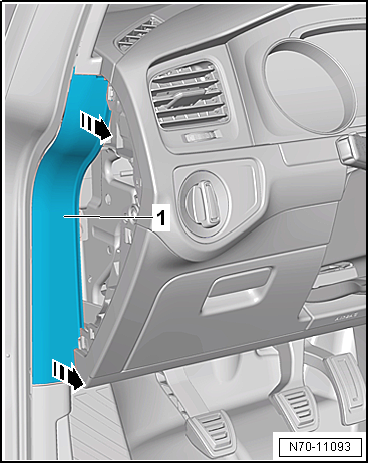
Remove side dash panel cover
→ Chapter. |
| – |
Unclip A-pillar gap cover -1-
from upper A-pillar trim and lower A-pillar trim
-arrows-. |
| – |
Release A-pillar gap cover -1-
from door seal beading and remove it. |
Note
| Following installation, ensure that the A-pillar gap
cover is positioned in door seal beading. |
| Installation is carried out in reverse order. |
|
|
|
Note
Removal and installation are described for the left vehicle
side. Follow same instructions for the right side as
appropriate.
...
Special tools and workshop equipment
required
Removal wedge -3409
...
Other materials:
Retrofitting a towing bracket
Fig. 108 Dimensions and attachment points
for retrofitting a towing bracket
First read and observe the introductory information
and safety warnings Volkswagen recommends having the towing bracket retrofitted
by a qualified workshop. The cooling system may need to be modified or heat shield ...
Assembly overview - front three-point seat belt, 4-door model and estate
1 -
Bolt
If removed due to an accident with seat belt fastened, renew bolt.
40 Nm
2 -
Belt end fitting
Removing and installing
→ Chapter
3 -
Bolts
Qty. 2
4.5 Nm
...
Round connector systems
Note
If necessary, any housing catches in place (secondary
locking mechanisms) must be released or removed prior to
disengaging the contacts using the prescribed tool
→ Chapter.
...
© 2016-2024 Copyright www.vwgolf.org

 Removing and installing sill panel moulding, 4-door model
 Removing and installing A-pillar trim