Volkswagen Golf Service & Repair Manual: Removing and installing alternator, vehicles with 1.2 l TSI engine, 1.4 l
TSI engine and 1.4 l TSI natural gas engine
| Special tools and workshop equipment
required |
|
|
|
| Torque wrench -V.A.G 1331- |
| – |
With ignition switched off, disconnect earth cable from
battery -A-
→ Chapter. |
| – |
Remove poly V-belt
→ Rep. gr.13. |
| – |
Remove tensioner for poly V-belt
→ Rep. gr.13. |
| Vehicles with air conditioner |
 Caution
| Risk of damage to air conditioner compressor,
refrigerant lines and refrigerant hoses: |
| Make sure refrigerant lines and hoses are not
excessively stretched, kinked or bent. |
|
| – |
Remove air conditioner compressor from bracket
→ Heating, air conditioning system; Rep. gr.87. |
| – |
Secure air conditioner compressor to lock carrier so that
refrigerant lines are not under tension. |
| Continued for all vehicles |
|
|
|
 Note Note
| If alternator -C--1- is stuck
in its bracket, screw bolts in again except for the last 2
turns. |
| Carefully hit bolt heads with flat side of hammer to release
sliding bushes of alternator mounting. |
|
|

|
| – |
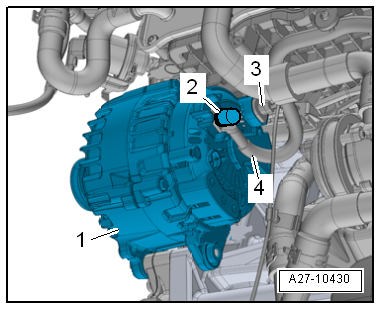
Remove alternator -C--1- from
bracket with electrical wiring still connected. |
| – |
Disconnect electrical connector -3-. |
| – |
Unscrew nut and remove terminal 30/B+
-4-. |
| – |
Remove alternator -C--1-
downwards to the right. |
| Install in the reverse order of removal, observing the
following: |
| – |
To facilitate positioning of alternator -C-, slide bushes of
alternator mounting slightly towards back. |
Note
| Ensure that bushes of alternator mounting slide freely and
are not to tight (loosen, if necessary); otherwise clamping
force of sliding bushes is too low even if specified torque is
applied. |
| – |
Reconnect battery -A-
→ Chapter. |
| – |
Always start engine and check belt running after completing
work. |
| → Chapter „Assembly overview - alternator“ |
|
|
|
1 -
Alternator -C-
Removing and installing
→ Chapter
Checking
→ Chapter
Removing and install ...
Special tools and workshop equipment
required
Torque wrench -V.A.G 1331-
...
© 2016-2024 Copyright www.vwgolf.org

 Assembly overview - alternator with sliding bushes
 Removing and installing alternator, vehicles with 2.0 l TSI engine