Volkswagen Golf Service & Repair Manual: Removing and installing battery, vehicles with high-voltage system
| Special tools and workshop equipment
required |
|
|
|
| Torque wrench -V.A.G 1331- |
|
|
|
| Torque wrench -V.A.G 1783- |
 WARNING
| Always make sure to comply with the warning notices
and safety regulations when working on the battery
→ Electrical system, General information; Rep. gr.27. |
|
| – |
Remove ignition key, if inserted. |
| – |
Remove luggage compartment floor from vehicle towards rear. |
|
|

|
| – |
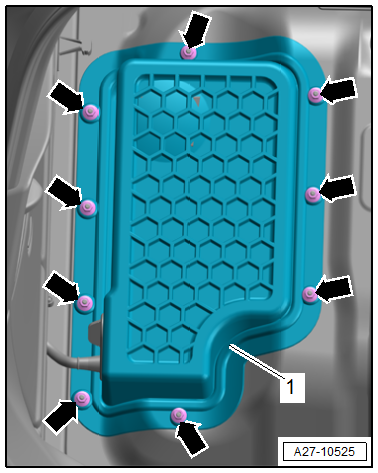
Unscrew nuts -arrows- for
battery cover -1-. |
| – |
Swing cover -1- upwards as far
as it will go. |
|
|
|
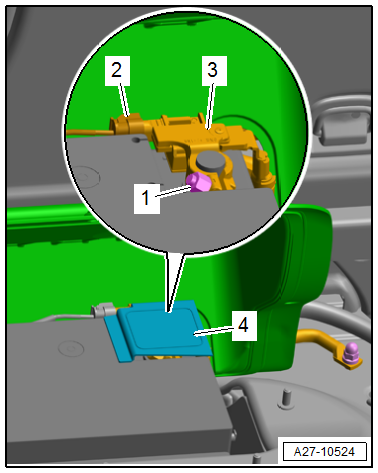
| – |
Open cover -4- for negative
battery terminal. |
| – |
Unplug electrical connector -2-
at battery monitor control unit -J367--3-. |
| – |
Loosen nut -1- several turns,
and disconnect battery terminal clamp of earth cable from
battery negative terminal. |
|
|
|
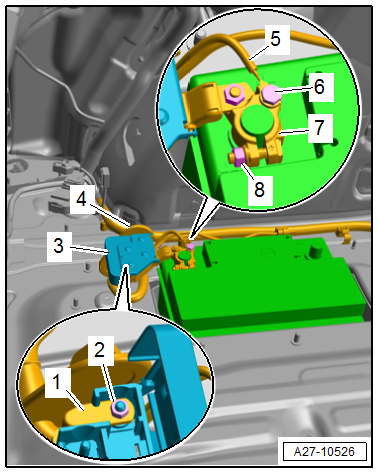
| – |
Unscrew bolt -6-, and lay
electrical wire -5- to one side. |
| – |
Open cover -3-, unscrew nut
-2-, and lay positive wire
-1- to one side. |
| – |
Press grommet -4- in cover
towards outside as far as it will go. |
| – |
Guide out positive wire -1-
with wiring harness through opening in cover. |
| – |
Loosen nut -8- several turns
and disconnect battery terminal clamp -7-
of positive cable from positive battery terminal. |
 Note Note
| Cover for battery compartment is not shown in illustration. |
|
|
|
| – |
Insert battery -A- into battery tray
-1- so that battery base strip lies against stop at back
and sides -arrows-. |
| It should no longer be possible to move battery -A- towards
rear or sides. |
|
|

|
| – |
Fit securing bracket -3- for
battery -1-. |
| – |
Tighten nut -2- for securing
bracket -3-. |
| – |
Ensure that battery -A- is seated securely. |
|
|

|
Special tools and workshop equipment
required
Torque wrench -V.A.G 1331-
...
Caution
Observe the following instructions and precautions
on safety when working on pyrotechnic components:
...
Other materials:
Aquaplus system (pearlescent and heliochrome)
Designation:
Pearlescent waterborne base coat -LPW 040 ...-
Heliochrome waterborne base coat -LHW 046 ...-
Pearlescent waterborne mixing paint -LWM 076 ...-
Issued 11.2 ...
Overview - drive shaft
I -
→ Chapter „Assembly overview - drive shaft, constant velocity joint
VL100“
II -
→ Chapter „Assembly overview - drive shaft, constant velocity joint
VL107“
III -
→ Cha ...
Removing and installing side trim panel
Note
Removal and installation are described for the left
vehicle side. Follow same instructions for the right side as
appropriate.
Special tools and workshop equipment
required
...
© 2016-2024 Copyright www.vwgolf.org

 Caution
 Removing and installing battery, vehicles without high-voltage system
 Disconnecting and connecting battery, vehicles without high-voltage system