Volkswagen Golf Service & Repair Manual: Removing and installing parking brake motor -V282-/-V283-
| Special tools and workshop equipment
required |
|
|
|
| Torque wrench -V.A.G 1331- |
| Vehicle diagnostic tester |
 Note Note
| Switch off ignition for at least 30 seconds before
disconnecting connector. |
|
|

|
| – |
Disconnect connector -2- from
parking brake motor -1-. |
|
|

|
| – |
Unscrew both hexagon socket head bolts
-arrows- from parking brake motor. |
| – |
Pull parking brake motor off brake caliper while twisting
parking brake motor back and forth slightly. |
Note
| Take care not to damage annular groove for seal and contact
surface on parking brake motor. |
| – |
Clean annular groove and contact surface of parking brake
motor. |
|
|

|
| – |
Lightly grease new seal and install it, taking care not to
twist or damage it. |
| – |
Grease Torx socket on input shaft of parking brake motor
completely. |
Note
| The sealing ring must not be allowed to turn out while the
parking brake motor is being installed! |
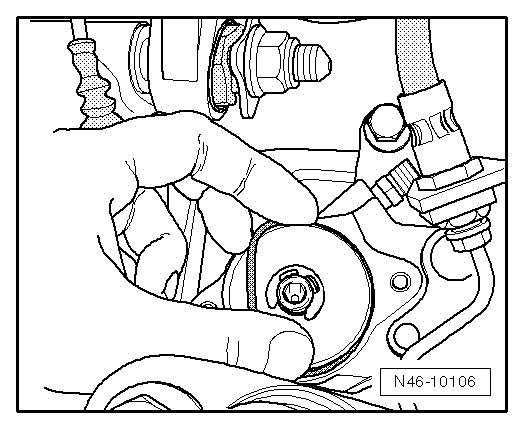
| – |
Carefully push parking brake motor onto brake caliper while
ensuring that seal is seated correctly. |
Note
| If necessary, turn input shaft back slightly using an E11
Torx socket -A- until parking brake
motor can be properly fitted. |
|
|
|
| – |
Turn parking brake motor until bolt hole and thread align. |
Note
| Make sure that parking brake motor is flush with brake
caliper. Never pull parking brake motor onto brake caliper using
securing bolts. |
|
|

|
| – |
Position hexagon socket head bolts
-arrows- by hand and tighten them. |
| – |
Carry out basic setting of brake system using
→ Vehicle
diagnostic tester. |
| → Chapter „Overview of fitting locations - parking brake“ |
|
|
|
1 -
Hexagon socket head bolt
8 Nm
2 -
Parking brake motor
Left parking brake motor -V282-, fitting location: on ...
Other materials:
Adjusting spray jets
Caution
Danger of causing damage.
Do not use any objects for cleaning spray jets!
Note
In case of uneven spray field due to impurities in th ...
Assembly overview - fire extinguisher
1 -
Bracket
Removing
–
Remove bracket -4-.
–
Remove seat cover and padding from seat pan
→ Chapter.
WARNING
Risk of eye injury.
Wear ey ...
Maximum permitted gross combination weight
First read and observe the introductory information
and safety warnings All data in the official vehicle documents take precedence
over these data. All data in this manual apply to the basic German model. The vehicle
data sticker in the service schedule and the official vehicle documents sho ...
© 2016-2025 Copyright www.vwgolf.org

 Overview of fitting locations - parking brake
 Brake pedal