Volkswagen Golf Service & Repair Manual: Removing and installing shock absorber, multi-link suspension, right shock
absorber
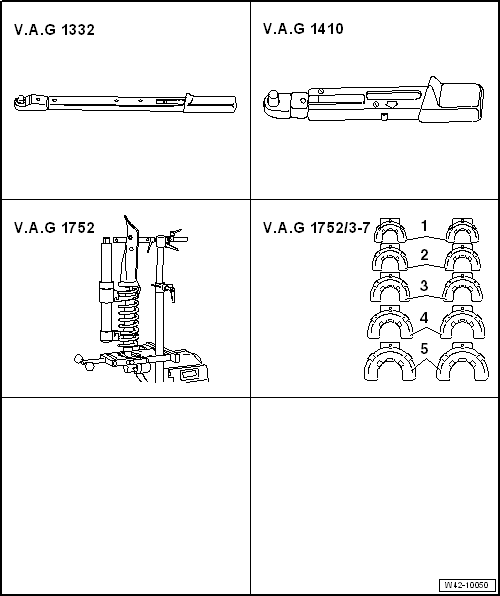
| Special tools and workshop equipment required |
| Torque wrench -V.A.G 1332- |
| Torque wrench -V.A.G 1410- |
| Spring compressor -V.A.G 1752/1- |
| Spring retainer -V.A.G 1752/3A- |
| Adapter -V.A.G 1752/9-, not illustrated |
| – |
Remove rear wheel housing liner
→ General body repairs, exterior; Rep. gr.66. |
| Vehicles with vehicle level sender |
|
|
|
| – |
Remove retainer for rear left vehicle level sender-2-. |
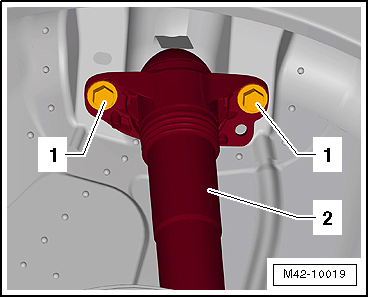
| Vehicles with adaptive chassis control DCC |
|
|

|
| – |
Disconnect connector -1- on
shock absorber -2-. |
| – |
Pull line -3- off shock
absorber -2--arrow-. |
 Note Note
| If there is moisture in the area of the connector, blow
compressed air on the contacts on the shock absorber and the
connector. |
| Continuation for all vehicles |
|
|

|
| – |
Fit spring retainer -V.A.G 1752/3A--1-
along with adapter -V.A.G 1752/9--2-
to uppermost spring coil -3-. |
|
|

|
| – |
Place spring compressor-3- on
adapter -V.A.G 1752/9--2-. |
| – |
Simultaneously insert lower spring retainer -V.A.G 1752/3A-
into spring -4-. |
| – |
Bolt spring compressor-3- to
adapter -V.A.G 1752/9--2-. |
| 1 - |
Spring retainer -V.A.G 1752/3A- |
| 2 - |
Adapter -V.A.G 1752/9- |
| 3 - |
Spring compressor -V.A.G 1752/1- |
 WARNING
| Ensure that coil spring is correctly seated in
spring retainer -V.A.G 1752/3A--arrow-
(risk of accident). |
|
| – |
Compress coil springs until load on shock absorber is
relieved. |
|
|

|
| – |
Unscrew bolts -1- for shock
absorber -2-. |
| Vehicles with stone guard |
|
|
|
| – |
Remove spreader rivet -1-. |
| – |
Unscrew bolts -2- for stone
deflector -3-. |
| – |
Remove stone guard -3- from
lower transverse link -4-. |
| Continuation for all vehicles |
|
|

|
| – |
Unscrew nut -1- and remove bolt
-2-. |
| Install in reverse order of removal, observing the
following: |
| The threaded connections of the shock absorber to the lower
transverse link may only be loosened and tightened in the
unladen weight position
→ Chapter. |
| – |
On vehicles with vehicle level sender, carry out basic
settings for wheel damper electronics → Vehicle
diagnostic tester. |
| → Chapter „Assembly overview - suspension strut, shock absorber,
spring, multi-link suspension“ |
| → Chapter „Assembly overview - transverse link“ |
| → Chapter „Torque settings for wheel bolts“ |
| Wheel housing liner
→ General body repairs, exterior; Rep. gr.66. |
|
|
 |
Special tools and workshop equipment required
Torque wrench -V.A.G 1332-
Torque wrench -V.A.G 1410-
Spring compressor -V.A.G 1752/1 ...
1 -
Shock absorber
Removing and installing
→ Chapter
Defective shock absorbers must always be degassed and drained before
...
Other materials:
Trailer detector control unit -J345-
General description:
The trailer detector control unit -J345- detects a power
consumption of at least 5 W
→ Remark when “towing a trailer” and passes this information
to various control units via the CAN data bus.
...
Assembly overview - clutch engagement
1 -
Shim for “K 1”
Determining thickness
→ Chapter.
2 -
Large engaging lever for “K 1”
With engagement bearing
Removing and installing
→ Chapter
...
Testing equipment and tools
List of test equipment, tools and materials
Note
This list is an overview of the test equipment, tools and
materials necessary for professional repairs to the refrigerant
circuit.
Caution
...
© 2016-2024 Copyright www.vwgolf.org

 Removing and installing shock absorber, multi-link suspension, left shock
absorber
Removing and installing shock absorber, multi-link suspension, left shock
absorber Repairing shock absorber