Volkswagen Golf Service & Repair Manual: Removing and installing underbody heat shield
 Note
Note
| The removal and installation procedures may have to be modified
slightly depending on engine fitted. |
| – |
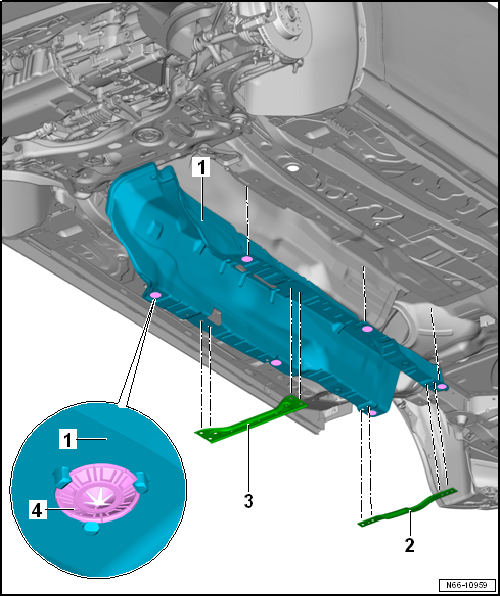
Removing centre underbody panel
→ Chapter. |
| – |
Removing front tunnel cross-piece -3-
→ Chapter. |
| – |
Removing rear tunnel cross-piece -2-
→ Chapter. |
| – |
Removing rear exhaust system
→ Rep. gr.26. |
| – |
Detach lock washers -4- (qty. 6) and
remove tunnel heat shield -1- to the back. |
| Installation is carried out in reverse order. |
Note
Removal and installation are described only for the left side.
Removal and installation of the right side are similar.
Removing
–
...
Note
The removal and installation procedures may have to be modified
slightly depending on engine fitted.
Removing
–
Removing rear exh ...
Other materials:
Removing and installing rain and light sensor, vehicles without front camera
for driver assist systems
Note
The rain and light sensor has a silicon layer (coupling pad)
which forms the contact surface to the windscreen.
The rain and light sensor has been designed so that it can
be used again. A prerequisite for re-use ...
Evaporator
The liquid refrigerant evaporates in the tubes of the
evaporator. The latent heat of evaporation is taken from the air
streaming past the evaporator fins. The air cools. The
refrigerant evaporates and is drawn into the air conditioning
system compressor ...
Charging container in air conditioner service station with refrigerant
Always follow the procedure described in the user's manual
for your air conditioner service station.
For every air conditioning system, a certain amount of
refrigerant is prescribed as the required charge To ensure that
the system ...
© 2016-2024 Copyright www.vwgolf.org

 Removing and installing B-pillar trim on rear door
 Removing and installing heat shield for centre exhaust system