Volkswagen Golf Service & Repair Manual: Emptying fuel tank less than 3/4
full, vehicles with four-wheel drive

| Special tools and workshop equipment required |
| Fuel extractor -VAS 5190A- (for E 85 fuel) |
| Fuel extractor -VAS 5190- (not shown) |
| – |
Observe safety precautions
→ Chapter. |
| – |
Observe rules for cleanliness
→ Chapter. |
| – |
Move front seats to foremost position. |
| – |
Remove bench seat
→ General body repairs, interior; Rep. gr.72. |
| – |
Disconnect earth wire from battery terminal
→ Electrical system; Rep. gr.27. |
| Extract fuel from both chambers of fuel tank using fuel
extractor -VAS 5190A- or fuel extractor -VAS 5190-. |
|
|
|
| – |
Unclip cover -1- for left and
right flange from retaining tabs -arrows-
using removal wedge -3409-. |
|
|

|
| – |
Unclip right sealing grommet -1-
downwards from cover -2-. |
| – |
Push cover -2- back along
wiring harness -3-. |
|
|

|
| – |
Push tab -2- upwards in
-direction of arrow A-. |
| – |
To do this, reach in with your finger between floor panel
and fuel tank. |
| – |
At the same time, carefully pull fuel pump control unit
-J538--1- out of mounting
-in direction of arrow B- by
grasping hold of wiring harness -3-. |
| – |
Guide fuel pump control unit -J538- out towards interior
between fuel tank and floor panel. |
| – |
Place fuel pump control unit -J538- together with wiring
harness to one side. |
|
|

|
| – |
Disconnect connectors -1 and 2-
as well as fuel line -3- from
flange. |
The fuel system is pressurised.Risk of injury due to fuel which may
spurt out.Wear eye protection.Wear protective gloves.Release pressure:
place clean cloth around connection and carefully open connection.
| – |
If fitted, remove fuel line -2-
leading to metering pump -V54- for auxiliary heater from sealing
flange. |
| – |
To do this, loosen lower hose clip. |
|
|

|
| – |
Open locking ring using wrench -T10202-. |
|
|

|
| – |
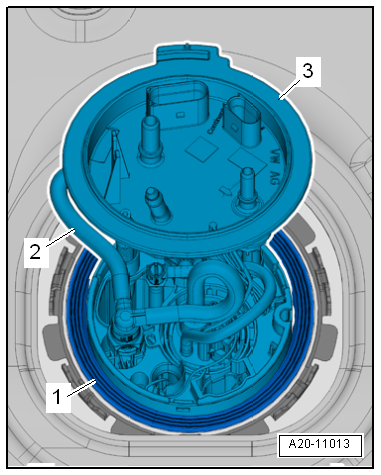
Carefully lift flange of fuel delivery unit
-3-. |
| – |
Remove gasket -1- and carefully
lift up the flange of the fuel delivery unit slightly more. |
| – |
Secure earth wire of fuel extractor to a bare metal part of
the body. |
|
|
|
| – |
Disconnect left connector -arrow-.
Lay cover -1- with wiring harness
to one side. |
|
|

|
| – |
Open locking ring using wrench -T10202-. |
| – |
Insert extraction hose of fuel extractor -VAS 5190A- or fuel
extractor -VAS 5190- as far as possible into fuel tank. |
| – |
Using fuel extractor, extract fuel from both chambers. |
| If the fuel tank needs only to be emptied, reinstall fuel
delivery unit
→ Chapter. |
| → Chapter „Assembly overview - fuel delivery unit and fuel gauge
sender“ |
|
|
 |
Special tools and workshop equipment required
Removal wedge -3409-
Wrench -T10202-
Torque wrench -V.A.G 1332-
Fuel extr ...
Other materials:
Removing and installing rear bass loudspeakers -R15-/-R17-, 4-door
Rear left bass loudspeakers -R15-/rear right bass
loudspeakers -R17- are located in rear doors (bottom).
Note
Removal and installation are described for the left side.
Removal and installation on the right side are carried out i ...
Removing and installing cylinder head
Special tools and workshop equipment
required
Socket -3410-
Removing
Note
Fit all heat shield sleeves in the same place when
installing. ...
Connecting vehicle diagnostic tester
Note
Observe the latest operating instructions for vehicle
diagnosis tester, which are displayed after selecting the
“Administration” and “Operating Manual” keys.
Special tools and workshop equipment
required
...
© 2016-2024 Copyright www.vwgolf.org

 Emptying fuel tank with fuel tank more than 3/4
full, engine code CWVA
Emptying fuel tank with fuel tank more than 3/4
full, engine code CWVA