Volkswagen Golf Service & Repair Manual: Plug-in connectors
Separating plug-in connectors
| Special tools and workshop equipment
required |
|
|
|
| Assignment of plug-in connectors |
 Note Note
| The plug-in connectors for fuel, vacuum and breather lines
are colour coded. There is either a coloured dot on the plug-in
connector or the release button is of the respective colour
→ Anchor. |
| Plug-in connectors for fuel lines must engage
»audibly« when joined. |
| Ensure plug-in connector is secured properly by pulling it. |
|
|

|
| Plug-in connector |
Colour
code on plug-in connector |
| Fuel supply |
Black |
| Fuel return line |
Blue |
| Breather |
White, beige |
| Vacuum |
Green |
| The fuel system is pressurised.Risk of injury
due to fuel which may spurt out.Wear eye protection.Wear protective
gloves.Release pressure: place clean cloth around connection and
carefully open connection. |
|
|
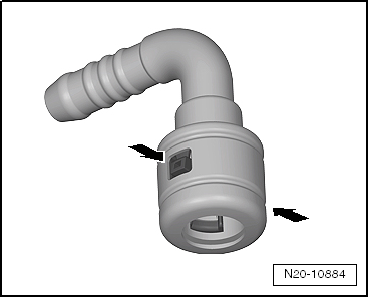
| Plug-in connector with release buttons
-arrows- on right and left |
|
|
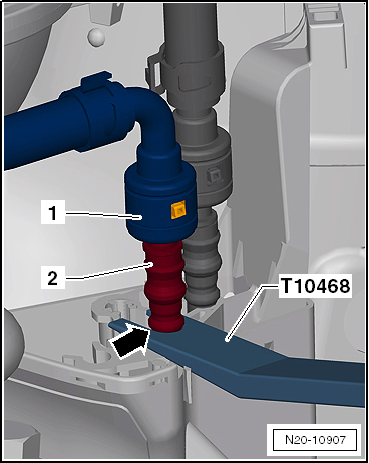
|
| It is necessary to counterhold the fuel connection
-1- in the engine compartment. |
| – |
Insert lever between heat shield and stop -T10468--arrow-
of fuel line -2- and counterhold. |
|
|
|
| Continuation for all coupling points of fuel system: |
| – |
Push plug-in connector -1- in
-direction of arrow A-. |
| – |
Press and hold release buttons. |
| – |
Pull plug-in connector -1- off
fuel line -2- in
-direction of arrow B-. |
| Take note of colour assignment during installation
→ Anchor |
| Plug-in connectors for fuel lines must engage
»audibly« when joined. |
| – |
Ensure plug-in connector is secured properly by pulling it. |
|
|

|
| Push-fit coupling with pull-release mechanism
-arrow-. |
|
|
|
| – |
Push plug-in connector -1- in
-direction of arrow A-. |
| – |
Pull pull-release mechanism -2-
in -direction of arrow B-. |
| – |
Pull plug-in connector -1- off
fuel line -3- in
-direction of arrow B-. |
| Take note of colour assignment during installation
→ Anchor |
| Plug-in connectors for fuel lines must engage
»audibly« when joined. |
| – |
Ensure plug-in connector is secured properly by pulling it. |
|
|

|
| Push-fit coupling with front button
-arrow- |
| – |
Press release button -arrow-
and pull off plug-in connectors. |
| Take note of colour assignment during installation
→ Anchor. |
| Plug-in connectors for fuel lines must engage
»audibly« when joined. |
| – |
Ensure plug-in connector is secured properly by pulling it. |
|
|

|
| Push-fit coupling with release button
-arrows- on right and left |
| – |
Push plug-in connector in -direction
of arrow A-. |
| – |
Press release buttons -arrows-
and pull off plug-in connector. |
| Take note of colour assignment during installation
→ Anchor. |
| Plug-in connectors for fuel lines must engage
»audibly« when joined. |
| – |
Ensure plug-in connector is secured properly by pulling it. |
|
|

|
| Push-fit coupling with release buttons
-arrows- on right and left |
| – |
Push plug-in connector -1- in
-direction of arrow- and maintain
pressure. |
| – |
Press release buttons -arrows-
and pull off plug-in connector. |
| Take note of colour assignment during installation
→ Anchor. |
| Plug-in connectors for fuel lines must engage
»audibly« when joined. |
| – |
Ensure plug-in connector is secured properly by pulling it. |
|
|

|
| Plug-in connector -1- with
release buttons -2- on right and
left: |
| – |
Press plug-in connector -1- in
-direction of arrow A- and maintain
pressure. |
| – |
Press release button -2- in
-direction of arrow B- and pull off
plug-in connector -1-. |
| Take note of colour assignment during installation
→ Anchor. |
| Plug-in connectors for fuel lines must engage
»audibly« when joined. |
| – |
Ensure plug-in connector is secured properly by pulling it. |
|
|

|
| Pressure limiting valve and fuel filter are integrated in
fuel delivery unit and cannot be renewed individually
→ Chapter. |
|
|
|
Removing
Fitting location
→ Item:
–
Release and pull off conn ...
Other materials:
Removing and installing Sanden belt pulley
Note
The pulley is sensitive to impact and should therefore be
treated with extreme care.
If the belt pulley overload protection has deployed, check
freedom of movement of air conditioner compressor before
rene ...
Checking holding pressure, engine code CWVA
Special tools and workshop equipment required
Pressure tester -VAS 6550-
Removal wedge -3409-
Connector cable -VAS 6550/3-3-
Connector cable -VAS 6550/3-4-
Vehicle diagnostic tester
...
Information on wheel rims
Structure of wheel rim
1 -
Wheel rim flange
Stop for tyre side beading
2 -
Hump (H2) on both shoulders of rim
Prevents the tyre slipping off the shoulder of the rim while driving
through tight b ...
© 2016-2024 Copyright www.vwgolf.org

 Removing and installing control unit for fuel tank leak detection -J909-