Volkswagen Golf Service & Repair Manual: Removing and installing A-pillar gap cover
 Note Note
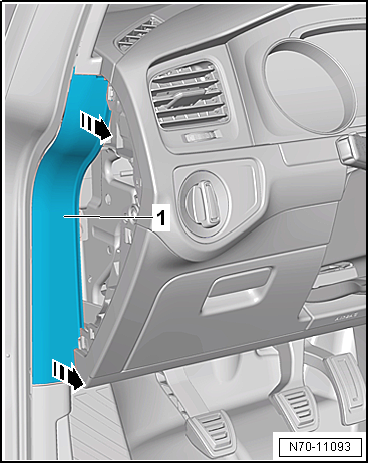
| Removal and installation are described for the left
vehicle side. Follow same instructions for the right side as
appropriate. |
| Special tools and workshop equipment
required |
|
|
|
| |
|

Removal wedge -3409 |
| – |
Remove side dash panel cover
→ Chapter. |
| – |
Unclip A-pillar gap cover -1-
from upper A-pillar trim and lower A-pillar trim
-arrows-. |
| – |
Release A-pillar gap cover -1-
from door seal beading and remove it. |
Note
| Following installation, ensure that the A-pillar gap
cover is positioned in door seal beading. |
| Installation is carried out in reverse order. |
|
|
|
Note
Removal and installation are described for the left vehicle
side. Follow same instructions for the right side as
appropriate.
...
Special tools and workshop equipment
required
Removal wedge -3409
...
Other materials:
Assembly overview - rear shelf support
Note
The illustration shows the rear shelf support on the left side. The
right-hand side is similar (mirror image of left-hand side).
1 -
Rear shelf support
Removing and installing
→ Chapter
2 -
Cli ...
Repairing shock absorber
1 -
Shock absorber
Removing and installing
→ Chapter
Defective shock absorbers must always be degassed and drained before
disposal
→ Chapter
Checking shock absorber following removal
& ...
Assembly overview - centre armrest
1 -
Intermediate padding
Allocation
→ Electronic Parts Catalogue
Removing and installing
→ Chapter
2 -
Centre armrest
Removing and installing
→ Chapter
3 -
Lid
...
© 2016-2025 Copyright www.vwgolf.org

 Removing and installing sill panel moulding, 4-door model
 Removing and installing A-pillar trim