Volkswagen Golf Service & Repair Manual: Removing and installing upper part of sump
| Special tools and workshop equipment
required |
|
|
|
| Allen key, long reach -T10058- |
| Hand drill with plastic brush |
| Sealant
→ Electronic Parts Catalogue |
|
|

|
| – |
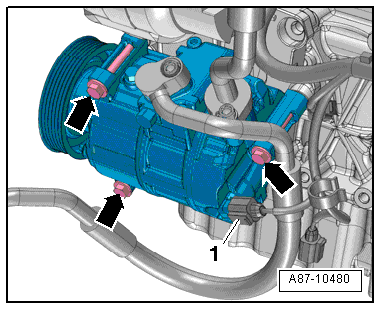
Remove air conditioner compressor from bracket
→ Heating, air conditioning; Rep. gr.87. |
| – |
Remove sump (bottom section)
→ Chapter. |
| – |
Remove oil pump
→ Chapter. |
|
|
|
| – |
Unscrew securing bolts -arrows-
for gearbox to upper section of sump -1-. |
|
|

|
| – |
Loosen and unscrew bolts in the sequence
-19 … 1-. |
| – |
Carefully detach upper part of sump from adhesive bond. |
 Note Note
| Renew bolts that are tightened with specified tightening
angle. |
| Renew gaskets, oil seals and self-locking nuts. |
| Danger of soiling lubrication system. |
| Cover open parts of engine. |
| – |
Remove sealant residues from cylinder block with a flat
scraper. |
Risk of eye injury caused by sealant residue.Wear eye protection. |
|

|
| – |
Remove sealant residue from upper part of sump, e.g. with
rotating plastic brush. |
| – |
Check oil galleries in upper part of sump and cylinder block
for soiling. |
| – |
Remove any oil and grease from sealing surfaces. |
Note
|
|

|
| Observe expiry date of sealing compound. |
| – |
Cut off nozzle on tube at front marking (diameter of nozzle
approx. 2 mm). |
| Danger of blocking lubrication system with excess sealant. |
|
|

|
| Do not apply sealant bead thicker than specified. |
| – |
Apply bead of sealant -arrow-
onto clean sealing surfaces of upper part of oil sump as shown
in illustration. |
| Thickness of sealant bead: 2…3 mm. |
Note
| Upper part of oil sump must be installed within 5 minutes
after sealant has been applied. |
|
|

|
| – |
Check that dowel pin -2- is
securely seated in cylinder block. |
| – |
Attach baffle plate -1- to
cylinder block. |
| – |
Position upper part of oil sump and tighten bolts
→ Fig.. |
| Further installation steps are carried out in the reverse
order; note the following: |
| – |
Install oil pump
→ Chapter |
| – |
Install air conditioner compressor
→ Heating, air conditioning; Rep. gr.87. |
| – |
Replenish engine oil and check oil level
→ Booklet. |
| → Chapter „Assembly overview - sump and oil pump“ |
| Securing gearbox to engine
→ Rep. gr.34 |
|
|

|
Engine oil
| Oil capacities, oil specifications, viscosity grades
→ Maintenance tables. |
|
|
|
Removing
–
Remove sump (bottom section)
→ Chapter.
– ...
Other materials:
Removing and installing cylinder head
Special tools and workshop equipment
required
Socket -3410-
Removing
Note
Fit all heat shield sleeves in the same place when
installing. ...
Accessories and parts
First read and observe the introductory information
and safety warnings Volkswagen recommends that you seek advice from a Volkswagen
dealership before purchasing accessories, spare parts or service fluids. For example,
if the vehicle is to be retrofitted with accessories or if parts have to ...
Removing and installing driver side footwell vents, RHD vehicles
Removing
Pyrotechnic components may trigger unintentionally.Risk of
injury.Discharge any static charge accumulated in your body by briefly
touching striker plate for door.
–
Remove driver side knee airbag
→ Genera ...
© 2016-2025 Copyright www.vwgolf.org

 Removing and installing oil pump