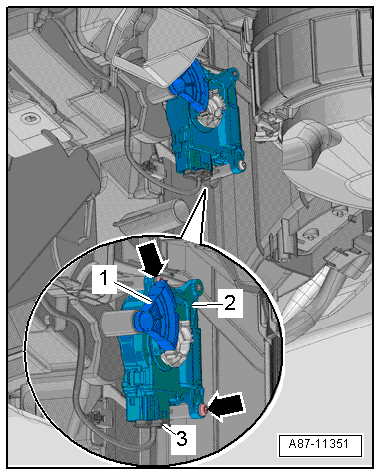
Volkswagen Golf Service & Repair Manual: Removing and installing right temperature flap control motor -V159-, LHD
vehicles
| Special tools and workshop equipment
required |
| Vehicle diagnostic tester |
| First carry out the following work: |
| – |
Switch off all electrical consumers. |
| – |
Remove baffle plate
→ Chapter. |
|
|
|
| – |
Pull off actuating lever -1-
for temperature flap. |
| – |
Unscrew bolts -arrows-. |
| – |
Remove right temperature flap control motor -V159--2-. |
| – |
Disconnect electrical connector -3-. |
|
|
|
Special tools and workshop equipment
required
Vehicle diagnostic tester
First carry out the following work:
...
Special tools and workshop equipment
required
Vehicle diagnostic tester
Bit ratchet
First c ...
Other materials:
Charge factor
There must be space both for liquid and vapour in a
container. As the temperature rises, the liquid expands. The
space occupied by the vapour becomes smaller. Eventually, there
will only be liquid in the container. After that time, even a
small increase ...
Checklist
To ensure your own safety and the safety of your passengers, observe
the following actions in the specified order :
Stop the vehicle at a safe distance away
from moving traffic and on a suitable surface .
Switch on the hazard warning lights using
the button .
Switch on the ...
Removing and installing water deflector
Note
Removal and installation are described only for the left side.
Removal and installation of the right side are similar.
Removing
–
Starting at bottom end, pull water deflector
-1- out of clip -3- and retaining
strip -2-.
...
© 2016-2024 Copyright www.vwgolf.org

 Note
Note
 Removing and installing left temperature flap control motor -V158-, RHD
vehicles
Removing and installing left temperature flap control motor -V158-, RHD
vehicles Removing and installing right temperature flap control motor -V159-, RHD
vehicles
Removing and installing right temperature flap control motor -V159-, RHD
vehicles