VW Golf manuals

Volkswagen Golf Service & Repair Manual: Removing and installing right temperature flap control motor -V159-, RHD vehicles

Volkswagen Golf Service & Repair Manual / Heating, air conditioning / Air conditioner / Control motors / Removing and installing right temperature flap control motor -V159-, RHD vehicles

Special tools and workshop equipment required
Vehicle diagnostic tester
Bit ratchet
First carry out the following work:
–  Switch off all electrical consumers.
–  Switch off ignition.
–  Remove ignition key.
Removing
  Note
Evaporator temperature sensor -V159- is accessible from footwell.
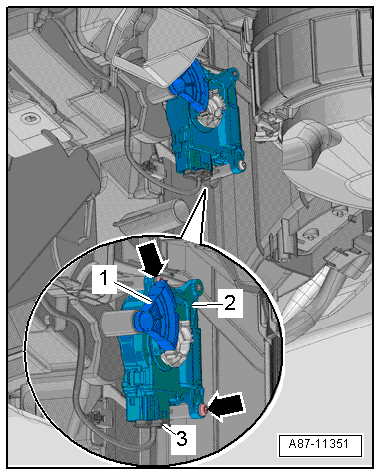
The illustration shows a left-hand drive vehicle. However, the procedure is analogous.
The bolts can be accessed with a small commercially available bit ratchet.
Pyrotechnic components may trigger unintentionally.Risk of injury.Discharge any static charge accumulated in your body by briefly touching striker plate for door.
   
–  Pull off actuating lever -1- for temperature flap.
–  Unscrew bolts -arrows-.
–  Remove right temperature flap control motor -V159--2-.
–  Disconnect electrical connector -3-.
 

Removing and installing right temperature flap control motor -V159-, RHD vehicles

Installing
Installation is carried out in the reverse order. When installing, note the following:
  Note
Check operation of flaps and hinge mechanism before fitting.
Make sure levers and shafts are properly fitted in the mounts.
–  Position control motor -1- on air distribution housing. Gear wheel -3- of control motor must engage in gear wheel -1- of temperature flap lever.
The long tooth -4- must engage in recess -arrow- on actuating lever.
  Note
If the gear wheels on the control motor and temperature flap lever do not align, rotate the receptacle in the control motor.
If the bolts cannot be fitted, the control motor is not completely seated on the housing.
–  Switch on ignition, connect respective control motor to vehicle wiring harness and select a setting on operating and display unit to set control motor to desired position (e.g. mid-position). Wait until control motor has moved to desired position and switch off ignition.
–  Route wiring harness so that it cannot come into contact with any moving parts (e.g. actuating arm on control motor).
  Note
Rotate control motor until it reaches a convenient position for installation. The direction of rotation can be changed by changing polarities.
–  Read event memory, and clear any entries displayed. Then, perform “basic setting”vehicle diagnostic tester in “Guided fault finding” mode.
–  As a final step, check operation of heater and air conditioning system.
Specified torque
→ Chapter „Assembly overview - heater and air conditioning unit“
 

Removing and installing right temperature flap control motor -V159-, RHD vehicles

Removing and installing right temperature flap control motor -V159-, LHD vehicles
Special tools and workshop equipment required Vehicle diagnostic tester First carry out the following work: ...

Removing and installing fresh air/recirculated air, air flow flap control motor -V425-, LHD vehicles
Special tools and workshop equipment required Vehicle diagnostic tester First carry out the following work: ...

Other materials:

Assembly overview - ignition system
1 -  Bolt The specified torque influences the function of the knock sensor. 20 Nm 2 -  Knock sensor 1 -G61- Removing and installing → Chapter 3 -  Spar ...

Removing and installing fresh air/recirculated air, air flow flap control motor -V425-, RHD vehicles
Special tools and workshop equipment required Vehicle diagnostic tester   Note The control motor has end stops with integrated limit switches instead of a potentiometer. First ca ...

Removing and installing operating unit for window regulator in driver door -E512-
  Note The removal and installation procedures are described for LHD vehicles. Removal and installation for RHD vehicles are similar. Removing –  Remove front door trim panel →  ...

© 2016-2024 Copyright www.vwgolf.org