Volkswagen Golf Service & Repair Manual: Fitting single wire seals
 Note Note
| Single wire seals prevent the ingress of moisture and dirt
in the contact housing. They are installed, for example, in the
engine compartment and must always be reinstalled following
repairs. |
| As standard, the single wire seal is crimped together with
the contact on the wire; this is not the case with the repair
wires. Before crimping the repair line, the single wire seal
must therefore first be pushed onto the wire. |
| It is essential that the single wire seals are of the
correct size to fit the cross section of the repair wire. The
outer diameter of the single wire seal is based on the socket
diameter of the contact housing. Only carry out the repair using
the correct assembly tool. |
| Assembling single wire seal: |
|
|
|
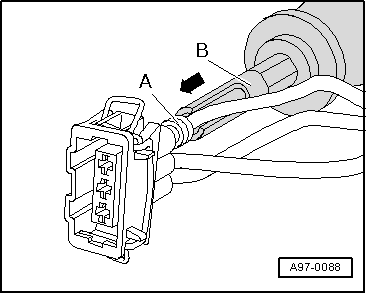
| – |
Disengage the contact locking mechanism using the
appropriate release tool -A- and
then pull the wire with the single wire seal backwards
-arrow- out of the contact housing. |
|
|

|
| – |
Cut off the old contact with the single wire seal from the
vehicle's own wiring harness. |
|
|

|
| – |
Slide the repair wire with the new contact in the respective
socket of the contact housing until it engages. |
|
|

|
| – |
Place the single wire seal -A-
on the free end of the repair wire. |
Note
| The small diameter of the single wire seal must face the
contact housing. |
| – |
Slide the single wire seal -A-
on the repair wire until it reaches the contact housing. |
|
|

|
| – |
Slide the single wire seal -A-
using the respective assembly tool -B-
fully into the contact housing. |
|
|
|
| – |
Trim the repair wire and the single wire of the vehicle's
own wiring harness accordingly using wire strippers -VAS
1978/3-. |
| – |
Crimp the stripped ends of the repair wire and single wire
of the vehicle's own wiring harness using the crimping pliers
and a crimp connector, as described in the chapter entitled
“Wiring open circuits with one repair position”
→ Chapter. |
|
|

|
If necessary, first open or disengage the secondary locking
mechanism of the contact housing
→ Chapter.
...
Note
For technical reasons, the contact housings for cut and
clamp technique can only be supplied with the cut ...
Other materials:
Plug-in connectors
Separating plug-in connectors
Special tools and workshop equipment
required
Lever -T10468-
Assignment of plug-in connectors
Note
The pl ...
Removing and installing sunroof button -E325-
Removing
–
Remove front interior light -WX1-
→ Chapter.
–
Remove bolts -arrows-.
–
Remove button -1- from inte ...
Displays
First read and observe the introductory information
and safety warnings
Display
Solution
ProActive occupant protection not available
Go to a qualified workshop and have the system checked.
ProActive occupant protection: function re ...
© 2016-2025 Copyright www.vwgolf.org

 Repairs to contacts in contact housings
 Repairs to contact housings using cut and clamp technique