Volkswagen Golf Service & Repair Manual: Removing and installing brake light switch, RHD vehicles
| Vehicle with diesel engine: |
| – |
Remove engine cover panel
→ Rep. gr.10. |
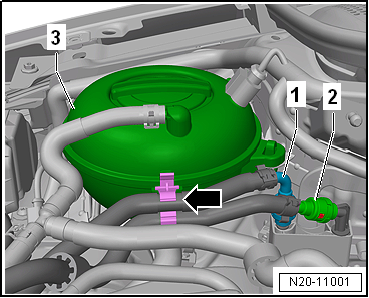
The fuel system is pressurised.Risk of injury due to fuel which may
spurt out.Wear eye pretection.Wear protective gloves.Release pressure:
place clean cloth around connection, and carefully open connection.
| – |
Release and pull off fuel supply lines
-1- and -2-. |
| – |
Separate plug-in connectors
→ Rep. gr.20. |
| – |
Unclip fuel lines -1- and
-2- from retainer
-arrow- on coolant reservoir
-3-. |
|
|
|
| – |
Remove securing bolts -2-. |
|
|

|
| – |
Open retainer -arrow- and
unclip fuel lines -1-. |
| – |
Then lay fuel filter to one side. |
|
|

|
| – |
Release electrical connector -1-
and pull off. |
| – |
Release catches using a screwdriver
-arrow-. |
| – |
Place coolant expansion tank onto engine. |
| – |
Remove upper toothed belt guard
→ Rep. gr.15. |
|
|

|
| – |
Release connector -1- and pull
off brake light switch -F--2-. |
| – |
Unscrew brake light switch -F- from brake master cylinder. |
| Install in reverse order of removal, observing the
following: |
|
|

|
| – |
Ensure that brake light switch -F--1-
seats properly on edge -arrow- of
brake master cylinder. |
| → Chapter „Assembly overview - brake servo/brake master
cylinder, RHD vehicles“ |
| Toothed belt guard
→ Rep. gr.15 |
|
|

|
Removing
Vehicles with diesel engine:
–
Remove air hose from air filter housin ...
Note
If there are problems with the brake servo, first check the
brake servo vacuum system
→ Chapter.
Special tools a ...
Other materials:
Removing and installing turbocharger
Special tools and workshop equipment
required
Engine bung set -VAS 6122-
Hose clip pliers -VAS 6362-
...
Leaks at shock absorbers
Shock absorbers are often replaced because of externally
visible leakage. Inspections on the test rig and in the vehicle
have shown that in the majority of cases this replacement is not
justified.
Slight loss of fluid (“sweating”) at ...
Undercoating, additional protected areas on CNG-powered vehicles
Note
Undercoating (stone-chipping protection) applied during repair work
must be identical in appearance and thickness to the original
undercoating.
Water drainage holes must remain clear.
All threaded studs and welded nuts with metric ...
© 2016-2025 Copyright www.vwgolf.org

 Removing and installing brake light switch, LHD vehicles
 Removing and installing brake servo, LHD vehicles